Certainly, the Icom 7300 delivers excellent transmit audio output with its stock microphone. K4QKY enjoys experimenting with software-based external transmit audio processing techniques as described in this article.
Why is this important?
Your vocal tone needs to be as natural sounding and articulate as possible. Avoid relying solely on what other hams may think of your audio as they will often disagree with what constitutes ideal-sounding transmit audio. So, develop your own style while avoiding unpolished or harsh-sounding audio that will likely annoy and distract your listeners. Always be mindful to not interfere with hams on adjacent frequencies.
Often misunderstood by Hams, voice process should only be used judiciously to achieve improved transmit audio reinforcement. As such, knowing how to properly tailor your transmitted audio is one of the most critical tasks to master. From correcting problems and enhancing your sound to adding cohesion to your voice, there’s a lot you can accomplish with proper equalization. Excessive processing should be avoided! Don't ruin your otherwise great-sounding voice and microphone with heavy-handed settings. Concentrate on achieving great-sounding audio at the source, and you will achieve far better results. This means choosing a high-quality microphone, minimizing shack noise, and employing the proper microphone technique. As such, understanding how to use it to your advantage can greatly enhance your sound. Learn to "work your mic by adhering to these techniques:
1. The placement of the microphone, relative to your mouth, plays a large role in the clarity and character of your voice. Experiment with mic placement. A good starting point is 3 - 5 inches.
2. Avoid lateral movements to either side of the microphone. Generally, it is necessary to remain "on-axis" (in front of the microphone) to ensure a clear tone.
3. It is preferable to remain the same distance from the microphone to ensure a consistent volume.
4. Consider the proximity effect whereby base sounding tones are enhanced by "close talking" a directional microphone, the type most hams use. Be careful doing this as it may make you more prone to "popping your Ps" when a burst of air from your mouth overloads and distorts the microphone. Popping occurs mostly on "plosives" (words that begin with "p," "b," and "t.") A windscreen or pop filter is a useful deterrent.
-
Low frequency (200–500Hz)
This frequency range is where muddiness often lives, but it’s also where the warmth of your voice originates. If your audio sounds mushy, try cutting low frequencies in this range. If your vocals are clear but lack warmth, try minimal boosting in this range.
-
Midrange (1-1.5kHz)
Almost universally, 1-3kHz is where nasal and other troublesome frequencies lie. Try cutting somewhere within this frequency range. More about the importance of surgical cutting in the midrange is discussed later on this site.
-
High frequency (1.5 to 3kHz)
Articulation resides here but be careful boosting too much as this can render your vocals harsh and jarring.
...The remainder of this article provides a setup guide for a software-based digital audio workstation (DAW) as an effective alternative to your IC-7300's built-in capabilities.
How K4QKY's scheme works
(1) Digital audio output from the Sennheiser Profile USB Condenser boom-mounted microphone is routed to the Windows 11 computer via type A/B USB cable. A USB microphone is used for simplicity purposes. You may elect to use a conventional wired microphone instead bearing in mind that you will need an outboard USB audio interface to convert analog to digital input to your PC.
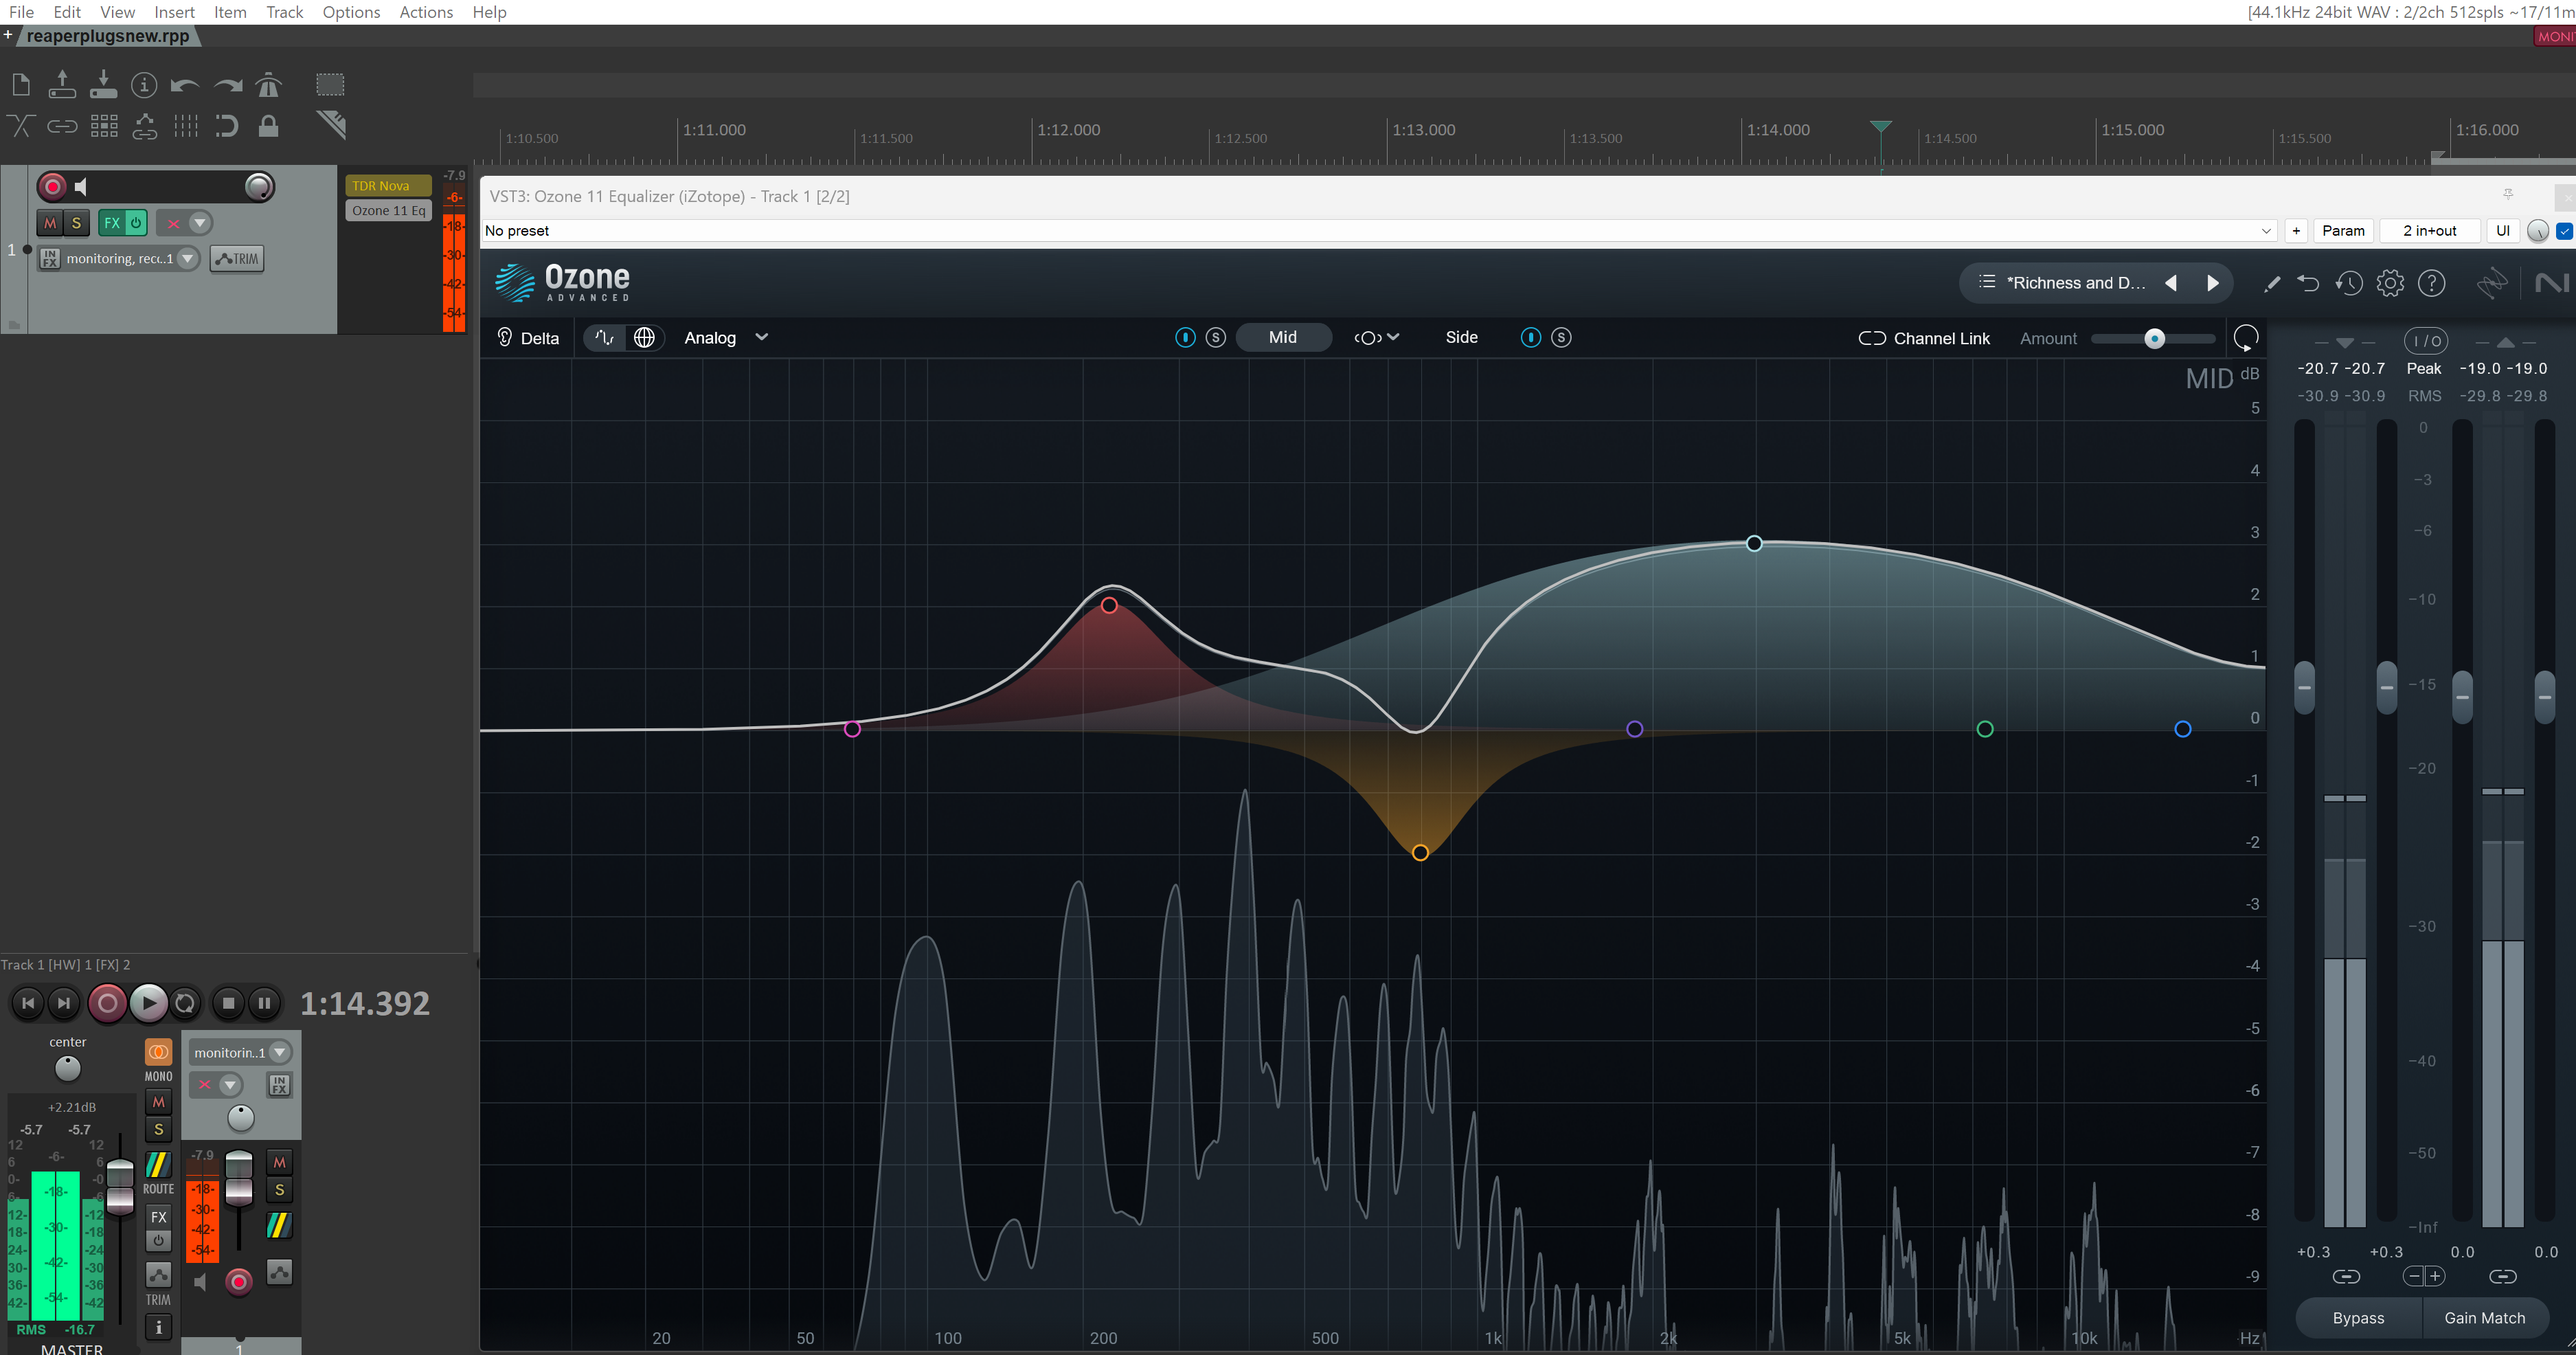
(2) Microphone input audio is subsequently processed within the Digital Audio Workstation (DAW) Reaper which hosts various Virtual Studio Technology (VST) digital effects plugins such as EQ, Compression, and Noisegate. K4QKY uses a single mult-effects plugin TDR NOVA, a parallel dynamic equalizer. Alternatively, he sometimes uses the free-Ozone 11 mastering plugin.
(3) Processed digital transmit audio output from the computer is then routed via another type A/B USB cable directly to the Icom IC 7300 USB port, then converted to analog and transmitted.
(4) Received analog audio from the Icom IC 7300 is converted to digital and routed via the same USB cable back to the computer to a pair of near-field Behringer MS 40 monitor speakers.
USB Connection
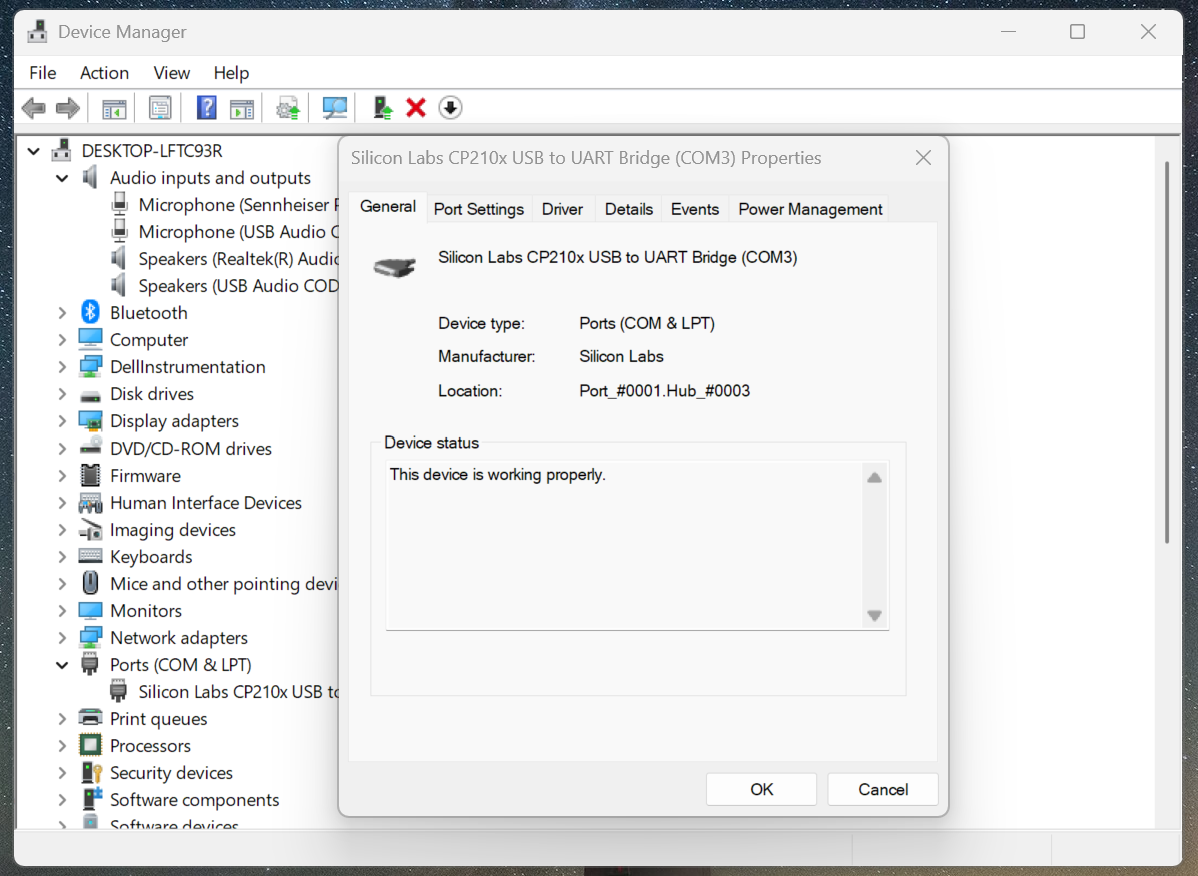
K4QKY interfaces his IC-7300 to the computer is via a standard A/B type USB cable which transports transmit and receive audio by by a "USB Audio CODEC" once the proper driver CP210x from the developer, Silicon Labs is downloaded and installed.
Note:
Conversely, Icom documentation at https://www.icomjapan.com/support/manual/1768/ calls for this driver to be downloaded from their website. This driver is essentially the same, albeit not necessarily the newest one available from Silicon Labs.
Step #1
Once the CP210x driver is downloaded from https://www.silabs.com/developer-tools/usb-to-uart-bridge-vcp-drivers and is installed on your computer, connect the USB cable to the USB port on the back of the radio. The other end of the USB cable goes to a USB Port on the computer. Then, turn on your radio and go to your computer's device manager to verify that the correct driver is installed and which comport is being used by the IC-7300 similar to what is depicted in the below screenshot. Make a note of the assigned comport number and proceed to Step#2 below.
Step #2
There are several IC-7300 menu items (Menu/Set/Connectors) that must be correctly set for your PC to effectively communicate with the radio once it has been connected and turned on. If you are not familiar with setting the menu options in your radio, you will need to read Section 12 Set Mode of the IC-7300 FULL manual PDF. This begins on Page 12-1.
IC-7300 Radio Menu/ Settings
DATA OFF Mod: Set to USB
DATA Mod: Set to USB
USB Send: Set to OFF
CI-V Baud Rate: Set to Auto
CI-V Transceive: Set to OFF
CI-V USB Port: Set to UNLINK
CI-V USB Baud Rate: Set to 115200
CI-V USB Echo Back: Set to ON
Step #3
Now, turn your attention to your windows PC and set it up to facilitate communications with the IC-7300. Start by opening Windows Sound Manager and open the "Recording" tab similar to the one shown in the below screenshot.
Note: K4QKY uses a USB microphone as depicted. You can use whatever microphone you prefer. However, if it is a conventional wired microphone you will have to employ a separate USB microphone interface device to convert the microphone's analog output to digital before it can be displayed here.
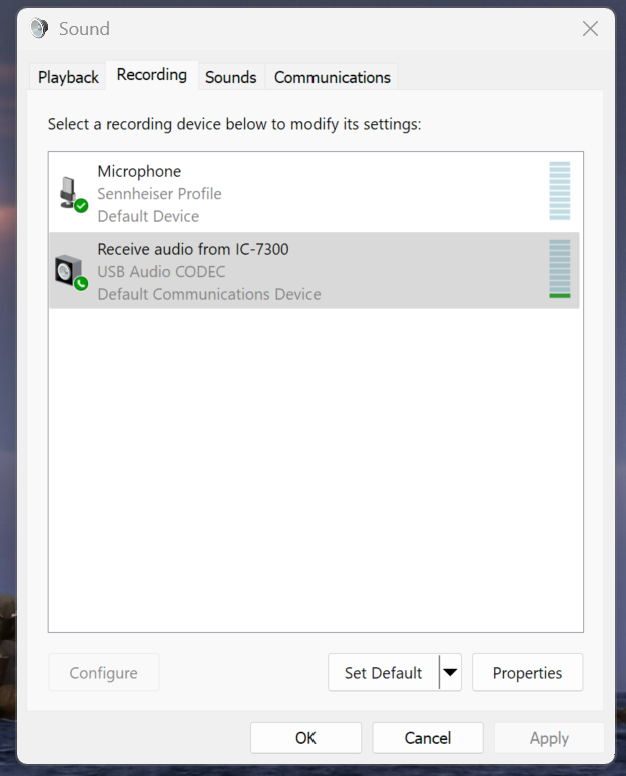
Make your microphone the default device and your USB Audio CODEC your default communications device.
Open the microphone device and initially set the Levels tab to 50 per cent and the Advanced tab to 1 channel, 16 bit, 4800 Hz. Next, open the USB CODEC device, *** click the Listen tab and click the small blue box adjacent to Listen to this device. Set Playback through to the Default Playback Device. Click the Levels tab and set the slider initially to 43 percent. Lastly, click the Advanced tab also set it to 1 channel, 16 bit, 4800 Hz.
***It is important that you check the Listen tab in order to hear USB receive audio through your PC speakers(s). Otherwise, leave it unchecked if you prefer to listen to receive audio directly from the rig's speaker jack.
Next, open the "Playback" tab similar to the one shown in the below screenshot.

Make your Speakers the default device and your USB Audio CODEC your default communications device.
Open the skeaker device and initially set the Levels tab to 62 per cent and the Advanced tab to 1 channel, 16 bit, 4800 Hz. Next, open the USB CODEC device, Click the Levels tab and *** set the slider initially to 39 percent. Lastly, click the Advanced tab also set it to 1 channel, 16 bit, 4800 Hz.
***It is important that you understand that this setting controls the amount of transmit audio output going to the linear/tuner/antenna, much like the microphone gain control on the rig itself.
Step #4
This is the most complex step of all. Here is where you will set up your digital transmit audio processing scheme on your PC. You will first need to download and install the Reaper DAW from https://www.reaper.fm/download.php. Then, do a Google keyword search for "reaper for ham radio microphone processing". Plan to spend lots of time and effort learning how to use Reaper.
Once you feel ready download your VST plugin of choice to be hosted by Reaper. There are many to choose from. For the purpose of this article, download and install Ozone 11 free EQ mastering plugin into Reaper. Here again, plan to spend lots of time learning how to use it to effectively tailor your microphone audio output should you desire to experiment with this technology.
Note: It is important that Reaper's output and input settings are consistent with your processing scheme. Do this by clicking "Options" from the Reaper toolbar and then clicking "Preferences" from the drop-down window which will reveal a settings box similar to the one in the below screenshot.

Note that "WASAPI" is the designated interface. Alternatively, you can set "ASIO" here. ASIO and WASAPI are different interfaces that applications can use to transport audio on Windows. WASAPI is Microsoft's native interface while ASIO is a 3rd party alternative built to better suit the needs of the pro audio market. You can download and install a free ASIO driver from https://asio4all.org/.
Should you elect to use WASAPI, designate the appropriate input and output devices and other settings as shown in the above screenshot.
Step #5
Now that you have completed setting up your transmit and receive scheme, you must adjust these settings as necessary to ensure that your transmit audio is acceptable. This important step is essential to ensure that your audio output is not overdriven or distorted.
Enjoy experimenting with this technology! Email